

 English
  عربى
عربى 
What Are the Best Tips for Installing Aluminum Railing Correctly?
Jul 01, 2026
Content
- 1 Why Aluminum Railing Is a Popular Choice
- 2 Gathering the Right Tools and Materials Before You Start
- 3 Measuring and Planning the Layout
- 4 Installing Posts Securely for a Stable Foundation
- 5 Attaching Rails and Balusters Without Warping the Line
- 6 Avoiding Common Installation Mistakes
- 7 Weatherproofing and Sealing Connection Points
- 8 Testing Stability and Finishing Touches
Why Aluminum Railing Is a Popular Choice
Aluminum railing has become a go-to option for decks, porches, balconies, and staircases because it combines durability with low maintenance requirements. Unlike wood, aluminum does not rot, warp, or attract termites, and it resists rust far better than steel since it naturally forms a protective oxide layer when exposed to air. This makes it an excellent long-term investment for homeowners who want a clean, modern appearance without the recurring upkeep that wood or wrought iron demands. However, achieving that long-lasting performance depends heavily on proper installation, since even the highest-quality railing system can fail prematurely if mounted incorrectly.
Gathering the Right Tools and Materials Before You Start
Preparation is one of the most overlooked steps in aluminum railing installation. Having every tool on hand before beginning prevents mid-project delays and reduces the risk of rushed, imprecise work. Most aluminum railing kits include posts, top and bottom rails, balusters, brackets, and fasteners, but you will need to supply your own installation tools.
- Power drill with appropriate driver bits for the included fasteners
- Level, both a standard 2-foot level and a torpedo level for tight spaces
- Tape measure and a chalk line for marking straight layouts
- Hacksaw or miter saw rated for cutting aluminum
- Rubber mallet for adjusting components without scratching the finish
- Masonry bit and anchors if installing on concrete surfaces
Measuring and Planning the Layout
Accurate measurements determine whether the finished railing looks professional or uneven. Start by measuring the total run of the railing, then divide that distance by the maximum spacing allowed between posts, which is typically 6 feet for most residential aluminum systems, though local building codes may specify tighter spacing. Mark post locations with chalk or tape before drilling, and double-check that baluster spacing will not exceed 4 inches between components, a standard requirement in most building codes to prevent small children from slipping through.
Accounting for Stair Angles
Stair railing installation requires additional planning since the rail must follow the incline of the staircase. Most aluminum railing systems include adjustable brackets designed specifically for stair applications, allowing the rail angle to match the stair pitch. Measure the rise and run of the staircase carefully, and confirm the bracket's adjustment range covers your specific angle before purchasing materials.
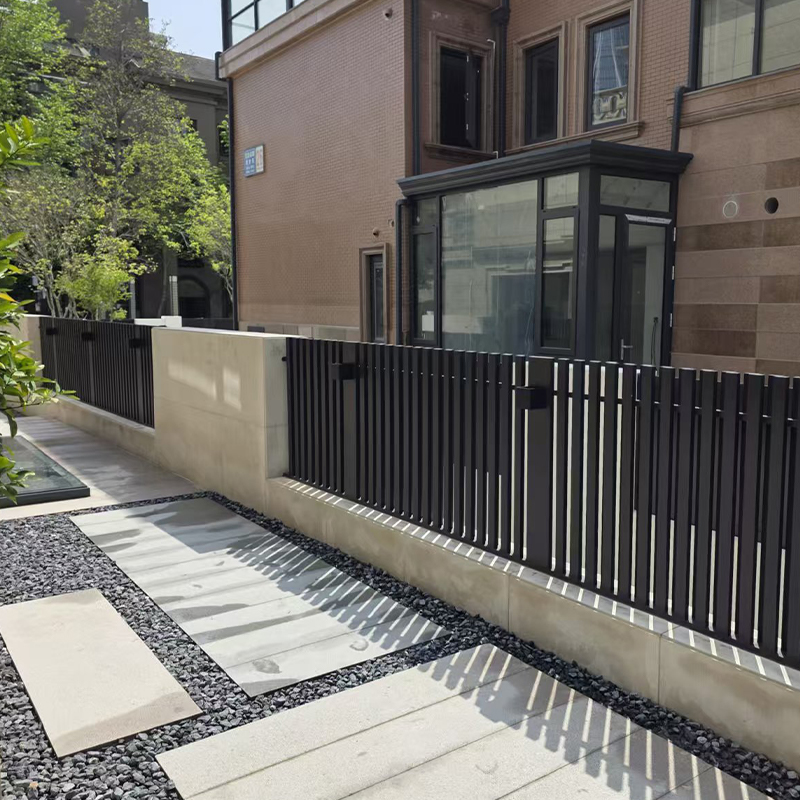
Installing Posts Securely for a Stable Foundation
Posts bear the majority of the structural load in any railing system, so their installation deserves the most attention. On wood decking, posts are typically secured using lag bolts driven into the deck's structural framing rather than just the surface boards, since surface-only attachment cannot support lateral force safely. On concrete surfaces, use expansion anchors or epoxy anchoring systems rated for the specific load requirements of your railing height and local code.
Always check each post with a level immediately after tightening the base, and again after the top rail is attached, since even slight shifts during installation can throw off the entire alignment. If a post is even slightly out of plumb, it becomes noticeably more visible once the horizontal rails are connected, so correcting the issue early saves significant rework later.
| Surface Type | Recommended Fastener | Key Consideration |
| Wood Decking | Lag bolts | Anchor into joists, not just deck boards |
| Concrete or Masonry | Expansion or epoxy anchors | Match anchor depth to concrete thickness |
| Composite Decking | Structural screws | Use blocking beneath surface for support |
| Brick or Stone | Sleeve anchors | Avoid drilling into mortar joints |
Attaching Rails and Balusters Without Warping the Line
Once posts are firmly set, the top and bottom rails can be attached using the bracket system included with most aluminum kits. Work from one end of the run to the other, using a string line stretched between end posts as a visual guide to keep the rail perfectly straight across longer spans. Tighten fasteners gradually and evenly rather than fully tightening one point before moving to the next, which helps prevent the rail from bowing or twisting under uneven pressure.
Balusters typically snap or slide into pre-drilled holes along the top and bottom rails. Insert them gently, checking periodically that spacing remains consistent, and avoid forcing a baluster into place if it feels tight, since this can crack the powder-coated finish. If a hole is slightly misaligned, a small amount of adjustment with a rubber mallet is usually enough to correct it without damaging the material.
Avoiding Common Installation Mistakes
Many installation problems stem from a handful of recurring mistakes that are easy to avoid with careful attention. Overtightening fasteners can strip the pre-drilled holes in aluminum components, since aluminum is softer than steel and more prone to thread damage under excessive torque. Skipping the string-line step on long runs often results in a rail that appears straight up close but visibly sags or bows when viewed from a distance.
- Failing to check local building codes for height and spacing requirements before installation
- Mounting posts into deck boards alone instead of anchoring into structural framing
- Neglecting to dry-fit sections before final fastening, leading to alignment issues
- Using mismatched fasteners that are not rated for outdoor or load-bearing use
- Ignoring manufacturer torque specifications, which can lead to stripped or loosened joints over time
Weatherproofing and Sealing Connection Points
While aluminum resists corrosion far better than most metals, connection points where fasteners penetrate the surface can still be vulnerable to moisture infiltration over time, particularly in coastal or high-humidity climates. Applying a small amount of exterior-grade silicone sealant around screw heads and post bases helps prevent water from pooling in these areas. For installations near saltwater environments, consider fasteners made from stainless steel or coated specifically for corrosion resistance, since dissimilar metal contact between standard steel screws and aluminum can accelerate galvanic corrosion.
Testing Stability and Finishing Touches
After the entire railing system is assembled, apply firm lateral pressure to several points along the rail to confirm there is no noticeable flex or movement. Building codes generally require railings to withstand a specific lateral load, often 200 pounds of force applied at any point along the top rail, so this test should be taken seriously rather than treated as optional. Inspect all visible fasteners for a flush, snug fit, and touch up any exposed cut edges with a matching paint pen to prevent bare aluminum from being exposed to the elements.
Finally, clean the entire railing with mild soap and water to remove installation dust, fingerprints, or residue, which not only improves the immediate appearance but also gives you a clear final chance to spot any missed adjustments before considering the project complete.


- Mobile
- Products
- Aluminum Window Series
- Aluminum Door Series
- Aluminum Sunroom Series
- Aluminum Sunroof Series
- Aluminum Louver Series
- Aluminum Railing Series
- Aluminum curtain wall
- Aluminum panel
- Aluminum door, window and curtain wall auxiliary materials
- Contact Us
-
-
+86-137 5720 8001

-
[email protected]

-
Room 102, Building 7, No. 399 Shushan Road, Hudong Street, Wuxing District, Huzhou City, Zhejiang Province, China

-



